
How to Use a Monitor as Video-Call Lighting
A white browser surface can add useful fill when a face is darker than the background, but the position and size of the source matter more than pushing brightness to maximum. A monitor is broad and close, which can produce softer light than a small bare lamp, yet it is relatively dim and its color is not a calibrated photographic standard. Treat it as a convenient adjustment, not a substitute for every lighting setup.
Put the source near the camera
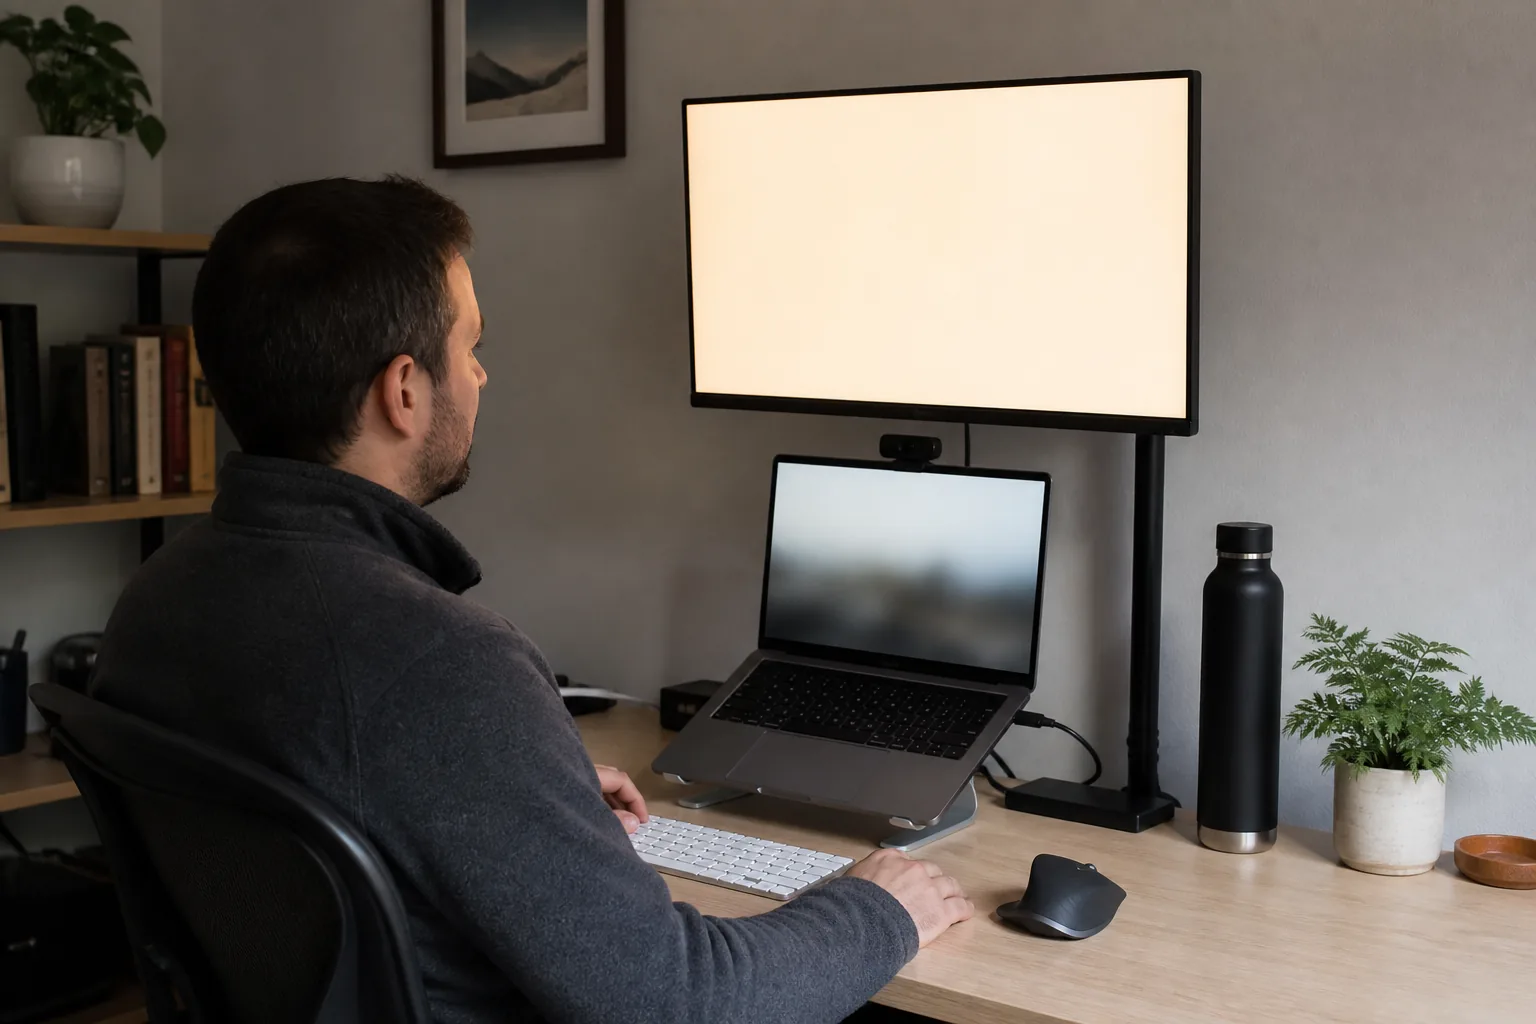
Light arriving from far below the camera can create unnatural upward shadows. Place the screen close to lens height and slightly above the eyes when possible. A spare tablet or second monitor beside the webcam is easier to aim than the display containing the call. Keep the source just off-axis for shape, or closer to the lens for flatter, more even fill.
Distance changes intensity quickly. Move the source closer before increasing brightness, but keep enough space for comfortable viewing and ventilation. A larger white area often looks softer because light arrives from more directions. In split mode, a warmer or brighter side can fill a shadow while the other side remains restrained.
Compare temperature; do not trust the label blindly
Start with Neutral, then compare Warm and Cool against the room. The tool’s temperature names are visual presets, not measured Kelvin output. Night Shift, Night Light, ambient-tone features, display calibration, panel technology, and physical brightness all change the actual light. A warm room lamp usually mixes more naturally with a warm screen; daylight may suit neutral or cool, but skin tone and camera processing vary.
Simulated luminance changes the on-screen RGB surface. The device’s physical brightness control still affects output and may have a much larger effect. Start low, raise gradually, and avoid clipped highlights on the forehead, nose, or glasses. A brighter screen is not automatically a better image.
Reduce reflections and stabilize camera exposure
- Raise or move the source to the side until the bright rectangle disappears from the lenses.
- Angle glasses slightly only if comfortable; do not adopt an awkward posture for the entire call.
- Enlarge and dim the source instead of using a small very bright patch.
- Reduce an excessively bright window or background before trying to overpower it with a monitor.
- If the call software allows safe manual exposure, set lighting first and then adjust exposure. Avoid constant automatic hunting.
Keep the call preview separate from the light surface when possible. ScreenOrbit does not request camera or microphone access, so the tool cannot judge exposure or skin tone. That privacy boundary is deliberate: you make the visual decision in the calling application.
A two-minute setup
- Open Zoom Lighting and Video Call Light on the spare screen.
- Place it near and slightly above the camera. Choose Full layout and Neutral temperature.
- Set physical and simulated brightness to a moderate level.
- Open the call preview, then compare Warm and Cool without moving anything else.
- Fix glasses reflections by changing source position, not by increasing intensity.
- Use fullscreen deliberately. Enable Wake Lock only if needed and supported.
Comfort, limitations, and alternatives
Do not stare directly at an uncomfortable bright field. Take normal visual breaks and lower output if the room is dark. This page makes no medical claim about eye strain, sleep, or a preferred color temperature. A purpose-built diffused lamp provides more output and physical control; a window can provide excellent light but may change during the call.
For a completely neutral surface use the White Screen. A Beige Screen can provide a simple warm field, while Gradient Background Generator is useful for creative backgrounds, not measured lighting.
Think in roles: key light, fill light, and background
The brightest directional source shaping the face is usually called the key. A weaker source near the opposite side reduces shadow contrast and acts as fill. The room or a separate lamp may illuminate the background. A monitor works best as modest fill or a close soft key in a dim environment; it rarely overpowers a bright window.
Decide which problem you are solving before changing controls. If the face is dark because a window is behind it, reduce or reposition the background first. If one eye socket is much darker, move a fill source toward that side. If the image is flat, move the source slightly off-axis rather than increasing brightness.
Why apparent size and distance matter
A larger source relative to the face produces softer-edged shadows. Moving the screen closer makes it appear larger and increases illumination, but it may also create stronger reflections in glasses and colored catchlights. Moving it farther away reduces both output and apparent size. Find the closest comfortable position that remains out of the camera frame and does not obstruct ventilation or work controls.
Four useful arrangements
One laptop, no spare device
Reduce the call window, place the light page beside or above the preview, and keep essential call controls accessible. This arrangement provides limited area and can change the direction as windows move. Do not enter fullscreen if doing so would hide the call.
Second monitor beside the camera
Place the light on the screen closest to the webcam and move the active call to the other display. Use Full or Soft layout. This is often the most practical arrangement because the light area can stay large while meeting controls remain visible.
Tablet or phone as close fill
Mount the device securely, avoid blocking its sensors or vents, and keep it out of the camera crop. A small device close to the face can create a sharp reflection; use lower brightness and a larger diffused physical source when available.
Two screens with split light
Use one broad neutral source near the camera and a weaker warm or cool surface from the side. Split mode can also balance the two sides of one large monitor. Avoid highly saturated colors unless a deliberate creative look is desired, because cameras can clip a color channel.
Coordinate screen light with room light
| Room condition | Starting choice | Adjustment |
|---|---|---|
| Warm household lamps | Warm at moderate level | Move closer before increasing output |
| Neutral office light | Neutral | Use fill only where shadows are distracting |
| Daylight from the side | Neutral or cool comparison | Turn the face toward the window; use screen as gentle fill |
| Bright window behind | Control background first | Close shade, change seat, or adjust trusted camera exposure |
| Dark room | Low neutral/warm | Avoid an isolated maximum-brightness rectangle |
Color temperature is not a character judgment and there is no universally “best” preset for skin. The camera’s automatic white balance, display spectrum, complexion, clothing, walls, and other lamps all influence the result. Choose the most natural and comfortable result in the actual call application.
Exposure and white balance
Automatic exposure often prioritizes the brightest large region. A bright background can leave the face dark; a bright screen can make the camera reduce exposure and erase the intended benefit. Arrange the scene first, then use the call application’s exposure control if it offers a trusted one. Avoid third-party camera utilities unless authorized on the device.
Automatic white balance can drift when a large warm or cool screen dominates the frame. Keep the light itself outside the camera crop, allow the camera a moment to settle, and lock white balance only if the application provides a reliable control and the room light will remain stable.
Glasses, catchlights, and screen content
Every bright source can appear in lenses. Raise the source, move it farther to one side, lower its brightness, or tilt its aim while keeping a comfortable posture. A broad screen produces a rectangular catchlight; Soft mode and lower output make it less dominant. Do not remove medically needed glasses only for appearance.
Hide personal notifications and unrelated windows on the light device. Fullscreen reduces distraction, but the browser and operating system can still show notifications unless you configure them through trusted settings. ScreenOrbit itself does not request notification permission.
Background and clothing checks
Leave separation between the subject and background when possible. A very bright white wall can reduce edge definition; an entirely black background can merge with dark hair or clothing. Add modest background light or change framing instead of pushing the face light to an extreme. Check for moiré from finely patterned clothing and for colored light reflecting from walls.
A five-minute pre-call checklist
- Clean the camera lens safely; do not clean the monitor immediately before using it unless it can dry fully.
- Frame the camera near eye height and simplify the background.
- Open the call preview and identify the key problem: face level, shadow balance, background, glare, or color.
- Place the screen light near the camera, start Neutral at moderate output, and compare Warm/Cool.
- Move the source to fix glasses reflections; do not solve every issue with brightness.
- Check microphone, network, and call controls separately. A better image does not compensate for inaudible sound.
- Enable Wake Lock only if useful, begin the call, and leave a normal path to the light controls.
Troubleshooting
| Problem | Likely first adjustment |
|---|---|
| Face remains dark | Reduce bright background; move light closer; check camera exposure |
| Forehead is clipped | Lower screen/physical brightness or move source farther off-axis |
| Large reflection in glasses | Raise or move source laterally; enlarge and dim it |
| Color looks orange/blue | Match room light, disable night mode if appropriate, let white balance settle |
| Image looks flat | Move source slightly to the side or reduce fill |
| Brightness changes constantly | Stabilize background and use trusted manual exposure if available |
Privacy and accessibility
The tool changes only its own pixels. It cannot view the call, judge appearance, record a participant, or know whether the camera is active. Keep brightness comfortable for everyone in the room, avoid rapidly changing colors during a meeting, and do not use a bright screen where it creates a distraction or sensory problem for another participant.
Use this page for one clear task
Use a spare display as a controlled fill light near a webcam without claiming calibrated output. Remote workers, teachers, streamers, interviewers, and creators use this setup in mixed home lighting. Write down the result you need before you follow a link or change a setting. A narrow goal saves time and keeps the final decision tied to evidence.
Read the full page once before acting when the task involves a display test, cleaning step, simulation, file right, privacy request, or support report. Then return to the exact section needed for the work. Keep the stated limits visible while you decide the next step. This route focuses on: Use a spare display as a controlled fill light near a webcam without claiming calibrated output.
Prepare a stable starting point
Place the display near camera height, reduce room backlight, and start with a comfortable physical brightness. Record the starting state before you change a control, move a device, submit a form, or rely on a policy statement. Use current source material and the current page version for any formal review.
Keep one issue per session or message. Separate a visual symptom from a hardware claim. Separate a browser simulation from a system event. Separate a generated file from third-party material placed inside the file. These boundaries make the evidence easier to assess. The main route risk is: A bright screen placed too low creates eye reflections and an upward shadow pattern.
Follow a practical four-part process
- Define the goal. Use a spare display as a controlled fill light near a webcam without claiming calibrated output. Stop if the task changes into a different problem.
- Capture the baseline. Record screen tone, physical brightness, distance, camera exposure, white balance, room lamps, and skin-tone result. Use exact values and names where they exist.
- Check the main risk. A bright screen placed too low creates eye reflections and an upward shadow pattern. Correct the setup before repeating the step.
- Choose the next action. Open Video Call Light and compare warm, neutral, and cool output inside the real call application. Keep the original record for comparison.
Build evidence another person understands
Record screen tone, physical brightness, distance, camera exposure, white balance, room lamps, and skin-tone result. Add the date and the page URL. Remove passwords, addresses, serial numbers, payment data, private messages, and confidential logs before sharing a screenshot or report. A short written sequence often carries more value than one close photograph.
For a comparison, repeat the same order and keep every unrelated variable stable. For a policy or rights question, quote the exact file or clause in your own words and link the source. For a bug, include expected behavior, observed behavior, and the smallest reliable reproduction path. This route asks you to record: Record screen tone, physical brightness, distance, camera exposure, white balance, room lamps, and skin-tone result.
Avoid weak evidence and unclear claims
- A bright screen placed too low creates eye reflections and an upward shadow pattern.
- The display spectrum and camera processing prevent a browser color from representing a measured studio light.
- Avoid several setting changes between the baseline and the result. Preparation for this route: Place the display near camera height, reduce room backlight, and start with a comfortable physical brightness.
- Avoid a private or model-specific claim without a current primary source. The page limit is: The display spectrum and camera processing prevent a browser color from representing a measured studio light.
- Avoid private data in public screenshots, links, examples, and support messages. The useful evidence is: Record screen tone, physical brightness, distance, camera exposure, white balance, room lamps, and skin-tone result.
- Avoid treating a search result, camera image, or forum comment as final proof. The main risk is: A bright screen placed too low creates eye reflections and an upward shadow pattern.
Move to the next useful action
Open Video Call Light and compare warm, neutral, and cool output inside the real call application. Keep the baseline and the page limit beside the result. Contact the relevant maker, seller, platform, specialist, rights holder, or ScreenOrbit editor when the decision falls outside the page scope.
Questions about How to Use a Monitor as Video-Call Lighting
What is the main purpose of How to Use a Monitor as Video-Call Lighting?
Use a spare display as a controlled fill light near a webcam without claiming calibrated output. The page keeps the task narrow so you reach a useful next action without mixing unrelated intent.
Who should use How to Use a Monitor as Video-Call Lighting?
Remote workers, teachers, streamers, interviewers, and creators use this setup in mixed home lighting. Start with the stated task and use the linked route or policy for the next decision.
What should you prepare before following How to Use a Monitor as Video-Call Lighting?
Place the display near camera height, reduce room backlight, and start with a comfortable physical brightness. Keep the starting state stable and write down any change you make during the process.
What information should you record for How to Use a Monitor as Video-Call Lighting?
Record screen tone, physical brightness, distance, camera exposure, white balance, room lamps, and skin-tone result. Specific details help another person repeat the same check or review the same request.
What common error weakens the How to Use a Monitor as Video-Call Lighting result?
A bright screen placed too low creates eye reflections and an upward shadow pattern. Pause when the context changes and restart from a known state rather than guessing.
What does How to Use a Monitor as Video-Call Lighting exclude?
The display spectrum and camera processing prevent a browser color from representing a measured studio light. Use the stated limit when deciding whether you need a maker, specialist, platform, or legal contact.
Does ScreenOrbit store settings from How to Use a Monitor as Video-Call Lighting?
Interactive tool settings stay in local browser storage where supported. Supported files stay in the tab. A contact message follows the separate contact and privacy process. Page scope: Use a spare display as a controlled fill light near a webcam without claiming calibrated output.
Does How to Use a Monitor as Video-Call Lighting work on phones and computers?
The written steps work across screen sizes. Browser features differ by device. Fullscreen, downloads, Wake Lock, file access, and audio depend on current browser support. Preparation: Place the display near camera height, reduce room backlight, and start with a comfortable physical brightness.
How often should you repeat the How to Use a Monitor as Video-Call Lighting process?
Repeat after a meaningful change such as a new device, display preset, browser, room condition, source, policy revision, or software release. Keep stable conditions for direct comparisons. Record: Record screen tone, physical brightness, distance, camera exposure, white balance, room lamps, and skin-tone result.
What should you do after How to Use a Monitor as Video-Call Lighting?
Open Video Call Light and compare warm, neutral, and cool output inside the real call application. Follow the closest linked route and keep the original goal, evidence, and limits in view.